10th Anniversary Event Tutorial & Guide!
Hello! My name is MooingCat and welcome to my tutorial for the 10th Anniversary Event! In this guide I will go through the mechanics of the event, the different rewards and my thoughts on which are best, as well as how to get the most out of this event! In this event you are not guaranteed to get the main building fully leveled for free, so in this guide I'll go through how to optimize your chances of getting it fully leveled, or if you don't care about it how to optimize for daily specials instead!
I also have a video version of this guide, where InnoGames have given me the opportunity to give away 3000 Diamonds to one of my viewers! Check out the video to learn how to enter :)
Table of Contents
Event Rewards
Before we get into the mechanics and strategies, let's have a quick look at the rewards you can get from this event! One thing to keep in mind is that this event replaces the spring event, so you will see all of the spring event rewards you'd expect from that among the daily specials.
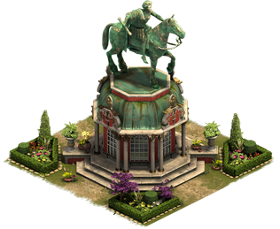
Grand Prize: Golden Orrery
 The Golden Orrery is a 4x5 residential building with 10 total levels. At max level it gives population and supplies, as well as:
- 10 Previous Era Goods
- 10 Forge Points
- 11-27% Defense Boost for Attacking Army
- Item Fragments: (30 required for full item)
- 45% - 10 Fragments of 30-Min Supply Rush
- 35% - 5 Fragments of Large (20%) Attack Boost
- 20% - 2 Fragments of One Up Kit
So in addition to the standard rewards, each day you will get some fragments for 1 of the 3 items listed. Overall, I think this is a very decent building. The closest comparison is the Olympic Treasury (same size), and compared to that the Golden Orrery gives -15 Goods, +2 Forge Points, +-1% Defense Boost (depending on age), and the additional item fragments. The fragments are not amazing, but they're definitely not bad, you can always find some use for them. The supply rush kits you can use for events / daily challenges (or sell to Antiques Dealer), the Attack Boosts you can use when fighting (or sell to AD), and the One Up Kits you can use to improve the stats of more buildings (or ... sell to AD :P).
Daily Specials: Stage of Ages & More!
Below you'll find a select list of daily specials from this event. This is not a complete list of daily specials, to see the complete list of daily specials (as they appeared on beta) you can check out the fandom wiki. I've split the daily specials into three sections: attack, forge points, and other (situational).
Attack Buildings:
- Stage of Ages Lv. 1 (New Building)

- Reasons to get: Highest boost / daily special, highest attack efficiency in SAAB+ (except Cherry Garden), great secondary productions
- Size: 4x4 (road required)
- Boost: 7 - 19% Attack | 0.39 - 1.06 Attack / Tile (including roads)
- Other: 4 FPs, 15 Prev. Age Goods, Population, Happiness
- Checkmate Square Lv. 1
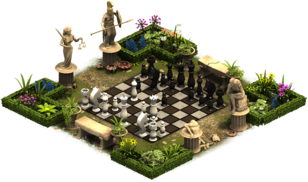
- Reasons to get: High boost / daily special, better attack efficiency than Stage of Ages below SAAB
- Size: 3x3 (road required)
- Boost: 5-11% Attack | 0.48 - 1.05 Attack / Tile (including roads)
- Other: Population, Coins
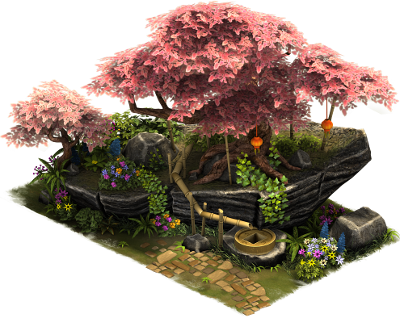
- Botanical Rotunda Lv. 1
- Reasons to get: High boost / daily special, slightly worse than the two buildings above but gives happiness instead of population if you need that
- Size: 3x3 (road required)
- Boost: 5-10% Attack | 0.48 - 0.95 Attack / Tile (including roads)
- Other: Happiness
- Royal Marble Gateway Lv. 1

- Reasons to get: Medium boost / daily special, slightly worse than the three buildings above (better than Rotunda in VF+), small so easier to fit in
- Size: 3x2 (road required)
- Boost: 2-7% Attack | 0.27 - 1.00 Attack / Tile (including roads)
- Other: Population, Happiness, Coins
- Cherry Garden (Spring) Set
- Reasons to get: highest attack efficiency (especially in lower ages - boost does not depend on age)
- Size: depends on layout (no road required for attack boost)
- Boost: depends on layout, but easily 1.00 - 1.10 Attack / Tile in any age.
- Other: Population, Happiness, Coins
- Sentinel Outpost Lv. 1 + Up.

- Reasons to get: Highest defense efficiency (in event & game), very small and easy to place, you know why it's good!
- Size: 1x1 (no road required)
- Boost: 2% / 4% Defense for Level 1 / 2
My recommendations: If you need defense for your attacking army you should go for the Sentinel Outpost! If you're looking for attack, you have quite a few different options. If you're in a low age then the Cherry Garden is by far the most efficient, so it's definitely a good choice, but I would also consider the Stage of Ages. It is less efficient, but you will get a lot more attack per daily special, and you will also get the other bonuses. So in lower ages I'd get Cherry Garden or Stage of Ages. If you are in the higher ages the Stage of Ages is probably the best option. With a large enough design the Cherry Garden is slightly more efficient, but the secondary rewards from the Stage of Ages more than make up for that IMO. Still, the Cherry Garden is not a bad option, and I will personally go for it because I love set buildings and want to expand my Cherry set! So in higher ages I'd get Stage of Ages or Cherry Garden. If you need some help with Cherry Garden designs, check out some of my videos on it!
Forge Points:
- Stage of Ages Lv. 1 (New Building)
- Reasons to get: Highest fp / daily special, great secondary productions
- Size: 4x4 (road required)
- Forge Points: 4 FPs | 4 FPs / DS | 0.22 FPs / Tile (including roads)
- Other: 7-19% Attack Boost, 15 Prev. Age Goods, Population, Happiness
- Suishun Mill Lv. 9

- Reasons to get: Highest fp efficiency
- Size: 4x5 (road required)
- Forge Points: 11 FPs | 1.22 FPs / DS | 0.50 FPs / Tile (including roads)
- Other: 25 Goods, 33% Supply Boost, Population, Happiness, Coins, Supplies, Medals
- Mikawa Bridge (Hanami Bridge Lv. 8)

- Reasons to get: Honestly ... get Suishun Mill over this :P
- Size: 4x6 (road required)
- Forge Points: 10 FPs | 1.25 FPs / DS | 0.38 FPs / Tile (including roads)
- Other: 25 Goods, Population, Happiness, Coins, Supplies, Medals
My Recommendations: If you want a lot of FPs quickly I'd recommend the Stage of Ages. It is considerably less space-efficient than the other options, but gives a lot more per daily specials and the other bonuses (attack) are much better IMO. But if you don't care about that, I'd go for the Suishun Mill if you want the most efficient FP building :)
If none of the buildings above interest you, there are always some situational / nice-to-have items like the Rogue Hideout / Shrink Kit, Reno Kit, and/or Store Building Kit. Neither Wishing Well / WW Shrink Kit appeared on Beta, so they will probably not be available this event.
Quest "Cheat List"
Below you'll find my "cheat list" for the quests in this event. This is not a complete list of quests, that you can find here. This is a list of quests you might need to plan ahead for, but I always recommend that you check out the complete list yourself to see if there are any other quests you might find challenging. Also, only the "difficult" part of a quest will be shown. For example, a part like "pay X coins" will not be included. NOTE: On beta they announced that they "decreased the difficulty for a small amount of quests", exactly what this means I'm not sure.
Event Mechanics
This is a brand new event with brand new mechanics, but don't worry, this is an easy one. I'm sure we all need a break from St Pat's! So, let's run through the new minigame.

To play the minigame, all you have to do is roll some dice (7)! And that's more or less it. A dice roll costs 100 Paper Money (9), and will move you ahead by 1 to 6 tiles from your current position (5). When you land on a tile you will get a reward, which can be one of:
- Reward Chest - These give various rewards, including a chance to get the daily special (11). There are two types of chests: "rare" with a 16% chance of the Daily Special, and "common" with a 13-15% chance of the Daily Special. A full list of chests can be found here.
- Resources - Medals, Coins, and Supplies
- Avatar - A nice way to get some old avatars if you're interested in that :)
- Building - Various old buildings can be won, including Royal Marble Gateway, Wishing Well, WW Shrink, Piazza Kit, Champ Retreat, and a bunch of other old special buildings.
When you leave that tile (roll again), the reward will be replaced by a new reward of the same type. The type of reward on each tile only resets at midnight, which means you are "stuck" with the tile types for the entire day. Some days you will have more chests, some days you will have more buildings, and so on.
In addition to the "regular" tiles, each corner tile is special. The top-left corner (1) is the starting position, and each time you pass it you get a Grand Prize (10). The top-right corner (2) gives a Golden Dice the first time you land on it each day, then any subsequent times that day it gives 125 Paper Money instead. The bottom-right corner (3) boosts your chance of getting a daily special when you land on a chest by +5%. The boost lasts for 5 hours, and is refreshed if you land on the tile again (so neither the boost nor timer stack). Finally, the bottom-left corner (4) gives you a chance of winning a piece of the new Grand Monarchs Set. Each time you land on it you only have a 50% chance of winning a selection kit, so you will probably not get many kits. Personally, I would only place these if you get enough and have lots of spare room, I would not focus on getting them.


Each day you will also have a Daily Goal (6). When you pass this tile (you don't have to land on it) you get the daily goal chest, which can give the daily special (20%), 100 paper money (40%), or 20 FPs (40%).
In addition to regular dice, you also have a few Golden Dice (8). These are "joker" dice, so you can choose which number you want to roll. These can be used to ensure you land on a tile you want, for example to get the free golden dice (2), the daily special boost (3), or the monarchs set chest (4).

Currency: Paper Money & Golden Dice
As described above, the main currency of this event is Paper Money, with a few additional Golden Dice as well. In total, you can get:
Paper Money:
- Starting: 300
- Daily Logins: 22*120 = 2640
- Rush Quests: 37*65 = 2405
- Daily Quests: 19*120 = 2280
- Milestones: 500+1000 = 1500
- Total: 9125
Golden Dice:
- Starting: 1
- Rush Quests: 3 (every milestone quest)
- Daily Quests: 2 (every milestone quest)
- Total: 6
Event Strategies
Alright, let's talk about strategies! You might think there can't possibly be much to this event, but you do actually have to make some choices. Unfortunately, if you want the Golden Orrery fully leveled you either need to be lucky or make the right decisions when you play. So, let's run through some numbers.

To get the Golden Orrery fully leveled you need 10 levels. You get 3 from milestones (lv. 1 + 2 upgrades), you get 1 from the Event Surprise Box if you have that, so you need the remaining 6-7 upgrades from Grand Prizes. That is 11 or 13 Grand Prizes, which means you need to travel 352 or 416 tiles. So in other words, the average number of Paper Money you need is (assuming 6 golden dice at 6 tiles each):
- With Surprise Box: (352-6*6) / 3.5 = 91 Dice Rolls = 9100 Paper Money
- Without Surprise Box: (416-6*6) / 3.5 = 109 Dice Rolls = 10900 Paper Money
You might think great, I have the surprise box, so the 9125 free Paper Money should do! But those numbers are the average Paper Money needed, and due to the nature of this event luck/rng plays a really big role. So instead of averages, it's perhaps more helpful to show the probability distributions of how far you will get with 9100 Paper Money:

So as you can see you have a decent chance of getting enough with the 9125 free Paper Money (if you have the surprise box), but you also have a good chance of missing out. If you don't have the surprise box you'll have a much harder time. So, how can you improve this, how can you get extra tiles for free? Let's go over the three ways to do this:
Extra Sources of Paper Money / Golden Dice
Incidents:
The simplest thing you can do is to go for incidents. Among the regular incidents you will have special incidents that give Paper Money, ranging from 5 to 100 each. You should be able to get quite a lot this way, probably somewhere in the region of 500-1000 Paper Money, possibly even more.

Daily Goals:
The second way to get additional Paper Money is through the daily goal. Each daily goal gives you a 40% chance to get 100 Paper Money, so on average you'll get 40 Paper Money for each daily goal. That means you can get up to 21*40 = 840 Paper Money.
Exactly how far ahead the daily goal is placed each day I don't quite know, but it seems to be around 10 tiles ahead. So to round it up, let's say around 3 dice rolls or 300 paper money each day. This means that if you go for the daily goal 10 days, for example, you will have 10*300-10*40 = 2600 less paper money to spend on the day(s) with the daily special(s) you want, or around 1/4 of your free paper money. If you go for the daily goal every day and save your remaining paper money for 2 days, you will only have around 4500-5000 for those 2 days, or around 1/2 of the free paper money.
Golden Dice / Paper Money from board:
The final way to get extra "free" tiles is by landing on the top-right corner to get either the Golden Dice or the 125 Paper Money. You can do this by strategically using the Golden Dice you get from quests to land on this tile. When you are within 6 tiles of the corner, you can use a Golden Dice to land directly on it. If you complete 11 / 13 boards for the Grand Prizes, that means you can get 11*3.5 = 35 to 13*3.5 = 45.5 extra tiles. Because you get back the Golden Dice, this is basically free tiles. However, you can only get 1 Golden Dice per day, so if you want all those Golden Dice you have to do this across 11 - 13 different days. This means you can't focus heavily on the daily specials you want.
Alternatively, if you want to spend all currency on 1-2 days, you can instead use your Golden Dice from quests to land on the extra Paper Money. As I'll go over a bit later you'll at least use 1 golden dice to land on the +5% boost (or 2 if you want the boost two days), though you will also get 2 Golden Dice the first time you land on the top-right corner those days. So you have 5-6 Golden Dice you can use to land on the corner, for an additional 625-750 Paper Money. This does mean you'll lose a few tiles by not doing 6 tiles with the Golden Dice, but because you only need to use a Golden Dice roughly every other board you have some control, so you're probably losing 1-2 tiles on average per Golden Dice while gaining ~4.4 tiles on average (1.25 dice rolls).
Focusing on The Golden Orrery
So if we put all of those together, you should be able to get, say, 760 (incidents) + 840 (daily goal) = 1600 Paper Money and ~40 additional tiles (golden dice). Looking at the distribution of all of this, it should be possible for most players to get the Golden Orrery fully leveled, but at the cost of daily specials (or control over which daily specials you get, the actual number isn't much different).

So, the degree to which you go for Daily Goals and Golden Dice / Paper Money from the top-right corner will depend on if you have the event surprise box and how lucky you've been so far during the event. If you want to be sure, I'd recommend tracking your progress. When you start playing a day, simply write down how much Paper Money you start with, and how far you've moved. That will give you your average tiles / dice roll, so if you're above 3.5 you're lucky and probably don't have to take many measures, or if you're far below 3.5 you might have to go for more daily goals / free golden dice.
The more you focus on daily goals and golden dice, the less control you have over which daily specials you get. You have to spend currency over multiple days, which means you have less to spend when the daily specials you want are available. So, alternatively you can ignore the Golden Orrery (or if necessary spend a few diamonds) and focus only on daily specials instead.
Focusing on Daily Specials
When focusing on Daily Specials, you should use one of your Golden Dice to land on the +5% tile (bottom-right corner) as soon as possible. Exactly how you do this will depend on luck, but I would recommend going directly to the bottom-right corner if you are within 6 tiles. If you are further behind than that, I would use your golden dice to get to the top-right corner if you're between 4 and 6 tiles away from that. If you're between 3 and 2 tiles away from it, you can either play it simple and use the golden dice here as well, or if you're adventurous you can roll a normal dice, and then a golden dice next roll. If you don't land on the golden dice the first board, you can always pick it up next time (you can only get 1 golden dice per day).

Beyond that, you simply have to roll your dice and pray! The additional golden dice you have you can either use to land on rare chests or buildings, or you can use them to land on the top-right corner for some additional paper money. If you use them on rare chests / buildings, I would only use them if you're 6 tiles away. You should have enough chances to spend your remaining 5 golden dice to only have to do it when 6 tiles away. If instead you go for the top-right corner, you will have to land on it roughly every other board, so I would probably use it if you're between 4 and 6 tiles away from it.
How many daily specials can you expect during the event? This will depend on 2 things: how much paper money you save for the day(s) with +5% bonus, and how lucky you get with the number of chests on the board. As I mentioned earlier, each day the type of reward on each tile is changed and you are stuck with these for the entire day. So if you're unlucky you might only get 15-16 chests, or if you're lucky you might get 18-19. So, here are the distributions for 5000 and 10000 paper money (simulating going for daily goal no vs all days), with 15 and 18 chests. If you wanna check other combinations you can do so with the simulator below!


Diamond Spending Costs
It's tricky to good estimates due to the variance in the event, but we can use some rough estimates. Based on what I've shown above, it costs roughly 900-1000 Paper Money per Daily Special and 900 Paper Money per Grand Prize. The price for Paper Money is 1990/1200 = 1.66 Diamonds / Paper Money. This gives the following average costs:
- Daily Special: 900*1.66 ≈ 1500 Diamonds
- Grand Prize: 900*1.66 ≈ 1500 Diamonds
- Full Golden Orrery: 20*1500 ≈ 30 000 Diamonds
In terms of what to buy, you should definitely buy Paper Money, it's cheaper and more efficient than Golden Dice. You could buy a few Golden Dice if you want specific items, but I'd recommend buying mostly Paper Money.


Simulators
Daily Specials Simulator
Tiles (Grand Prizes) Simulator
Table of Contents
- Table of Contents
- Event Rewards
- Quest "Cheat List"
- Event Mechanics - How the Event Works!
- Event Strategies
- Diamond Spending Costs
- Simulators
- Comments